You can now free install our themes automatically with Magenting.com - professional Magento hosting.
Initial installation
1. Copy files from the package theme/ dir to your Magento Directory
(PSD/ dir in the package holds PSD source files).
2. Navigate to Backend->System->Configuration->Design->Package Tab-> Current Package Name Field and set this field to default value
3. Navigate to Backend->System->Configuration->Design->Themes Tab and set all fields to sex value.
4. Navigate to Backend->System->Configuration->Content Management Tab and set "Enable WYSIWYG Editor" to Disable by Default value.
Now do the following actions from the admin side.
Create category for main navigation menu
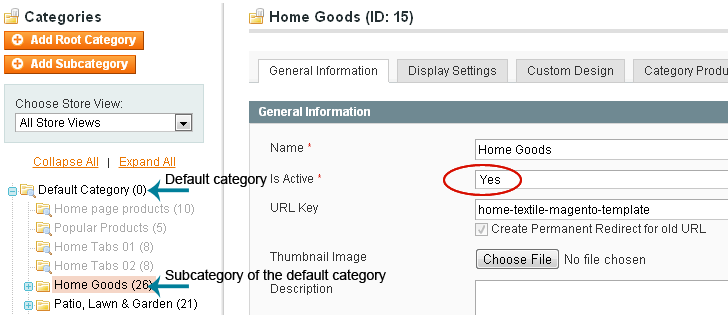
In order to get the main navigation visible, you need to create at least one active subcategory in the root folder. Category should be subcategory of the Root (default) category. Category must be active to be showing in the main navigation.

Create hidden categories
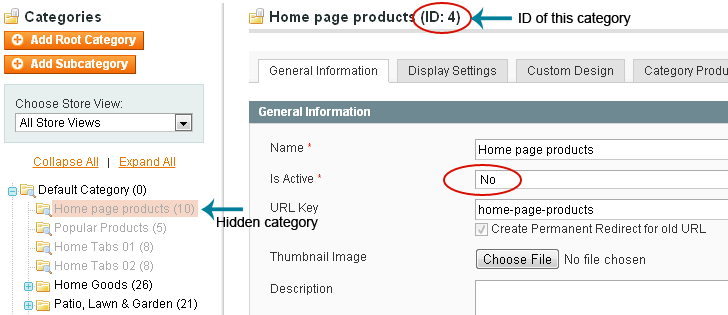
Create 2 categories as subcategories to your theme default category. They must be inactive to be hidden in the main navigation. These categories will be for "HomePageProducts" and "Popular products". Remember the IDs of these categories. See the image below.
Video tutorial by Template-help.com: How to add a category
Once categories are created it is good to add several products to them. Video tutorial by Template-help.com: How to add a simple product
Do not forget to keep indexes in touch. System->Index Management
Create Static Block head_phone_block
Go to CMS->Static Block to add new static blocks.
| Block Title* | head_phone_block |
| Identifier* | head_phone_block |
| Store View* | Select correct store view |
| Status | Enabled* |
| Content |
Create Static Block Top Menu
Go to CMS->Static Block to add new static blocks.
| Block Title* | top-menu |
| Identifier* | top-menu |
| Store View* | Select correct store view |
| Status | Enabled* |
| Content |
Create Static Block left_info_block
Go to CMS->Static Block to add new static blocks.
Do not forget to replace "PopularProductsCategoryID" with the ID of one of the created categories.
| Block Title* | left_info_block |
| Identifier* | left_info_block |
| Store View* | Select correct store view |
| Status | Enabled* |
| Content |
Create Static Block footer_links
Go to CMS->Static Block to add new static blocks.
| Block Title* | footer_links |
| Identifier* | footer_links |
| Store View* | Select correct store view |
| Status | Enabled* |
| Content |
Edit home page
Go to CMS->Pages and Edit/Add home page
| Page Title* | Place here anything you want |
| URL Key | home |
| Store View | Select correct store view |
| Status | Enabled* |
| Content Do not forget to replace "HomePageProducts" |
|
| Layout | 2columns with left bar * |
| Layout Update XML |
Our extensions
One Page Magento Checkout, Shipping Price Calculator, Smart Catalog, Stylish Store Switcher, Back to Top button
Included in the package.
- One Page Magento Checkout
- Shipping Price Calculator
- Smart Catalog
- Stylish Store Switcher
- Back to Top button
Custom Menu
Please load the extension here
Third-party extensions
We have tested extensions on various mobile devices. We highly recommend:
Other guides
- Customize the display of categories
- Static Content (includes the news, testimonials, brands and highlighted categories)
- Backgrounds and Buttons
- Site width (How to change site width / Smart-catalog is disabled)
- How to manage "jQuery Cycle Plugin" effect, for templates without "Total Slider Manager"
Congratulations! Your magento theme is ready!
Thank you for using this theme.
Customer support
We provide support services through our special form at Web-Experiment.info. If you have any questions, please feel free to email us via our support form here here
If you are using non English language(es):
Video tutorial by Template-help.com: How to install a new language
"Most Popular" sentence is not present in the default language packs. We need to add it manually.
Open file directory where your Magento is. Go to "app/design/frontend/default/[YOUR_THEME]/locale/"
There is a "en_US/translate.csv" file there. Copy it to any locale you need (like "da_DK/translate.csv") and edit "translate.csv" file.
It holds this text:
"Most Popular","Most Popular"
You need to change it to:
"Most Popular","[[Most popular in your language]]"
Note that file encoding should be UTF8.
Magento How Toes
Useful video tutorials powered by Template-help.com
- How to remove the warning message about {{base url}}
- How to add a category
- How to add a simple product
- How to create a configurable product
- How to create an attribute
- How to create an attribute set
- How to configure tier pricing
- How to configure a product listing layout
- How to add a static page
- How to manage html pages content
Magento template customization
Video tutorials powered by Template-help.com
